


SUPPORT
FAQs & Product Support
Find answers to common questions about TIKITAKA FTG products, from purchasing to use and setup.

26 questions
Questions and answers
Compatibility & Connection Can the PS5 edition also be used on PC?
Yes. The PS5 version works with PC, Switch, Switch 2, PS4, and PS5.
Orders & Shipping When will my order ship?
Regular items ship on the day payment is confirmed or within 2 business days. Dispatch operations run Monday through Friday; we are closed on Saturdays, Sundays, and public holidays.
General custom orders take 7–28 calendar days (about 14 days on average), depending on the model and order volume. Made-to-order products such as Elite and R1A follow the lead time shown on each product page; general custom estimates do not apply.
After dispatch, estimated international delivery is 8–20 days, depending on the destination country. This is an estimate, not a guarantee. Delivery time is additional to production and dispatch time. See shipping and delivery details
Compatibility & Connection Which devices are supported?
Some products support PS5/PS4, PC, Nintendo Switch, and/or Nintendo Switch 2. Supported platforms differ by model and edition, so check the product page and user manual for the item you are buying. For connection instructions, also see the PS5/PS4 and Nintendo Switch setup guides in this FAQ.
Getting Started How do I get started with my product?
Products are configured before shipment for the edition you ordered. The PS5 edition is generally set up for PS5, while the standard PC edition is generally set up for PC.
Connection steps and controls after connecting vary by model. Consult the user manual for your model and edition.
Getting Started How can I check that the buttons are responding correctly?
Connect the controller to a PC and use Gamepad Tester to check the buttons and directional controls. Use it to inspect input status separately from checking controls in a game.
Compatibility & Connection Which input mode should I use?
Select an input mode based on the device or game you are connecting to. These are general setup guidelines for products with GP2040-CE. Changing the input mode alone does not make an unsupported platform compatible.
- PC or a supported external adapter: XInput mode
- PS4 games playable on PS4 or PS5: PS4 mode
- PS3, or PS4 games that support legacy controllers: PS3 mode
- Nintendo Switch: Switch mode
- MAME cabinets and PC rhythm games that use keyboard input: Keyboard mode
Supported platforms, including PS5, and authentication requirements depend on the product model, edition, and game. Check the user manual before changing settings.
Compatibility & Connection How do I configure the controller for PS5/PS4?
Check the model, edition, and game before changing settings
For PS5, check that the product page for your model explicitly lists the PS5 edition, and consult the manual for that edition. The presence of an EXT. port or authentication device by itself does not confirm compatibility with every model or game. Changing the input mode does not turn a PC edition into a PS5 edition.
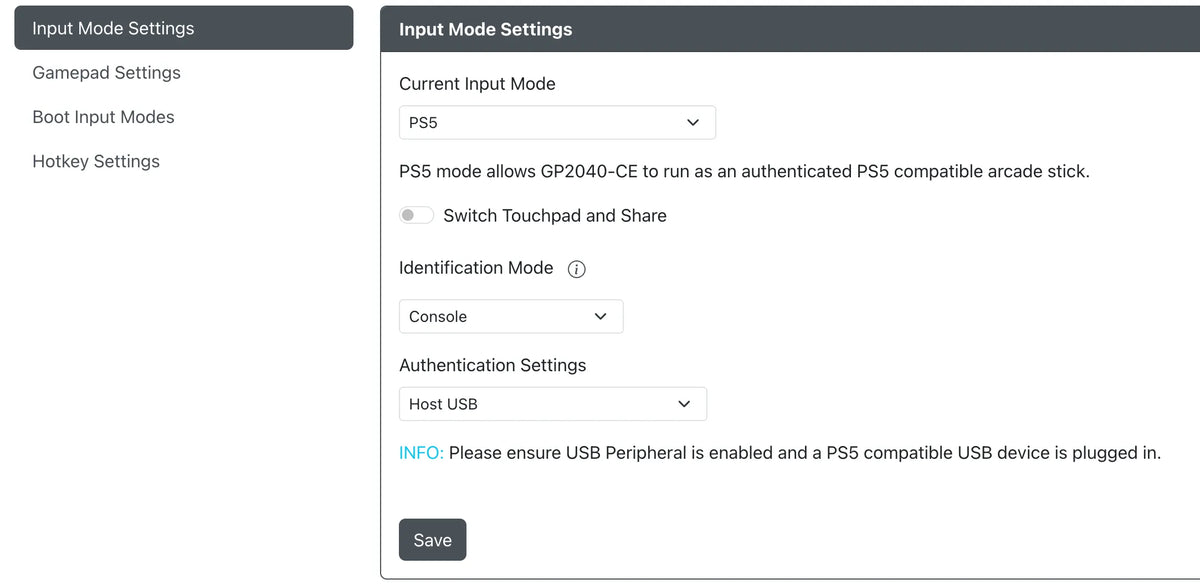
The S15-PS5 edition ships in PS5 mode. After connecting it to PS5, press HOME. These steps apply to the S15-PS5 edition and should not be applied to every model.
Check settings after a reset or configuration change
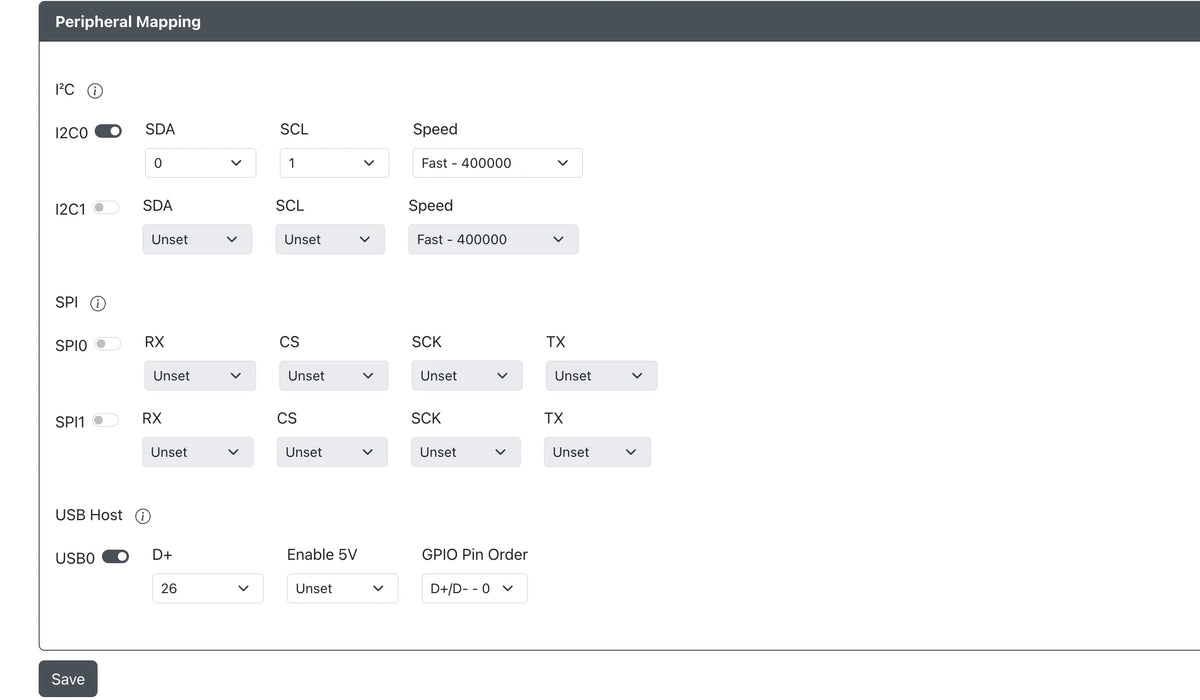
The images below show examples of the Input Mode Setting and Peripheral Mapping screens. Do not use the images alone to set identical values on every model; compare them with the manual for your model and edition. If connecting to PS4, check PS4 compatibility and input mode separately.
For pre-purchase information, see Choosing a PS5 edition and connection requirements; to compare models, see the Leverless Controller lineup.
Compatibility & Connection How do I configure the controller for Nintendo Switch/Nintendo Switch 2?
For models that support Nintendo Switch/Nintendo Switch 2, select “Nintendo Switch” under “Input Setting” in the Web Configurator. Use Nintendo Switch mode for Nintendo Switch 2 as well.
Supported platforms and required settings vary by model, edition, and firmware. Check the user manual for your product.

Setup & Usage What is the Web Configurator?
A browser-based screen for configuring the controller on a PC. You can adjust shortcuts, button mappings, startup screens, and other settings.
On supported products, hold the button assigned to START while connecting the controller to your PC via USB, then enter “http://192.168.7.1” in your browser. Products with a display show when they are in configuration mode.
192.168.7.1 is a local configuration page that is available only when a product is connected in configuration mode. It is not a regular website or router admin page.
Do not use options such as “Danger Zone” or “Get the latest version” unless the product instructions tell you to. They may change your settings or firmware and prevent the product from working properly.
Orders & Shipping Can I customize the top panel or button layout?
On supported models, you can customize button layouts and top-panel designs. Check the product page and the current customization tool for available options and how to create and export design data.
Upload the data through the attachment field on the product page when placing your order. The order cannot be placed without uploading the data. Data attached when placing an order cannot be changed later by email.
Standard custom orders take an estimated 7–28 calendar days, averaging about 14 days. This does not apply to made-to-order products such as Elite or R1A; check the individual lead time on the product page.
Orders & Shipping How much is shipping?
Shipping costs vary by product and destination. Enter your delivery address at checkout to see whether shipping is available and which options and rates apply.
If an order is split into multiple packages, shipping may be calculated separately for each package. In some destinations, customers may be responsible for import duties, taxes, or other import charges. See the shipping policy for details
Orders & Shipping What payment methods are available?
Available payment methods depend on your delivery destination. Review the options available for your order at checkout.
Follow any payment deadline or billing terms shown during checkout or provided by the payment provider.
Once payment is complete, cancellations or changes to the order or custom specifications for customer reasons are not accepted.
Overseas Warranty and Parts Support Is there a warranty?
For overseas defect claims, we provide a 90-day warranty from the purchase date. Covered replacement and repair parts are free; under the regular warranty, the customer pays shipping for parts. Buttons are covered only for initial defects, and failures caused by modifications are not covered.
Failures reported more than 7 days after receipt are handled by shipping replacement or repair parts under the warranty terms. Returns and refunds for failures are not available. For initial defects or shipping damage reported within 7 days after receipt, the store pays parts shipping. See the full return, initial-defect, and warranty terms
Overseas Warranty and Parts Support Who pays to ship replacement or repair parts?
For overseas initial defects or shipping damage reported within 7 days after receipt, the store pays shipping for replacement or repair parts.
Under the regular 90-day warranty from the purchase date, covered parts for overseas claims are free and the customer pays shipping. Please contact us first so we can confirm the support details.
Orders & Shipping Can I return, exchange, or cancel an order?
Once payment is complete, cancellations or changes to the order or custom specifications for customer reasons are not accepted. The same policy applies to orders placed by mistake.
Returns for customer reasons are limited to unopened and unused products reported within 7 days of receipt. You are responsible for a return fee equal to 20% of the product price, plus shipping costs. Used products, products showing signs of use, and customized products are not eligible.
For overseas parts support, please report initial defects or shipping damage within 7 days of receipt. For regular products, severe damage that makes the item unusable or major operating failures are handled by shipping replacement or repair parts. Minor issues and issues with customized products are also handled by sending replacement or repair parts. Covered parts are free. Defect claims do not qualify for whole-product replacements, returns, or refunds.
If an included replacement part resolves the issue, it is not treated as an initial defect. Minor scratches that do not affect use remain excluded from initial-defect claims and customer-requested returns. For initial defects reported within 7 days after receipt, the store pays shipping for replacement or repair parts. For parts sent under the regular 90-day warranty from the purchase date, the customer pays shipping. See the full return, initial-defect, and warranty terms
Compatibility & Connection What settings are needed for PS4/PS5 with GP2040-CE?
Products with GP2040-CE use authentication settings such as PS4 Mode or PS Passthrough. The examples below are for earlier GP2040-CE configurations and do not apply to every model.
- PS4: Use PS4 Mode or the PS Passthrough add-on.
- PS5: Some configurations disable the PS4 Mode add-on, enable PS Passthrough, and set the input mode to PS4. Also set the controller/fight-stick type to match the product.
The PS5 edition ships with the required settings configured. Check the manual for your model and edition before changing settings or resetting it. Changing settings on the PC edition alone does not make it PS5-compatible.
Compatibility & Connection What is PS Passthrough?
An add-on for GP2040-CE that uses another controller or an authentication dongle to respond to PS4/PS5 authentication.
Depending on the device used, support may be limited to PS4. For setup details, see “PS Passthrough” under “Add-ons” in your firmware’s Web Configurator.
Compatibility & Connection Why does the controller stop working after a while on PS4/PS5?
PS4/PS5 authenticate controllers. In configurations where authentication does not complete correctly, input may stop working about 8 minutes after connection.
This authentication timeout does not occur when using PS4 Mode on a PC. When using a PC, use XInput mode as the standard option to make compatibility with supported games easier.
Compatibility & Connection What is the “8-minute timeout”?
This is when PS4/PS5 cannot authenticate the controller and stops accepting input about 8 minutes after connection. In affected configurations, the following may happen:
- Connect the controller and press the PS button to begin using it.
- After about 8 minutes, authentication fails and the controller stops responding.
- Reconnecting may restore operation temporarily, but it will stop again if the authentication conditions have not changed.
Compatibility & Connection How can I prevent the 8-minute timeout?
Use an authentication method supported by your product and firmware. In the earlier GP2040-CE PS4 Mode add-on, one method is to configure the file required for authentication. See the GP2040-CE documentation for details.
On products with an OLED display, successful authentication may change the display from “PS4” to “PS4:AS.” Display behavior and setup steps vary by version, so follow your product’s manual.
Compatibility & Connection Do you provide the keys or files required for PS4 Mode authentication?
TIKITAKA FTG does not provide the keys or files required for PS4 Mode authentication.
Getting Started Why does the OLED display look blurry?
On models where a matte-finished top panel sits over the display, the panel may make the image look blurry.
For affected panels, one suggested approach is to apply a properly sized piece of clear tape or screen protector to the part of the panel above the display. Panel materials and construction vary by model. If you are unsure whether this applies to your product, contact us before proceeding.
RGB & Lighting How do I adjust the RGB lights?
On supported products, you can adjust the RGB lights with the following button combinations. Button names use XInput notation. Controls may vary by model or settings, so check the user manual if needed.
- SELECT + START + X: Next animation
- SELECT + START + A: Previous animation
- SELECT + START + Y: Increase brightness
- SELECT + START + B: Decrease brightness
- SELECT + START + RB: Increase the LED parameter
- SELECT + START + RT: Decrease the LED parameter
- SELECT + START + LB: Increase the button-press parameter
- SELECT + START + LT: Decrease the button-press parameter
RGB & Lighting How do I configure the side and rear RGB lights on M-series products?
On supported M-series products, you can configure the side and rear RGB lights with the “LED LAMP” smartphone app.
- Install “LED LAMP” from your smartphone’s app store.
- Turn on the product and open the app.
- Use the app’s wireless connection feature to find and connect to the product.
Check the user manual for your model for compatibility and connection instructions.
Setup & Usage What is the EXT. port for?
The EXT. port is an expansion port for connecting supported authentication adapters, controllers, and other devices. Available functions and supported platforms depend on the connected device.
Do not use the EXT. port to connect the product itself to a game console. Follow the user manual for which port and device to use.
Setup & Usage How do I configure the Web Configurator?
Connect a supported TIKITAKA FTG product to a PC by USB in configuration mode to change settings in a browser. Chrome is recommended. Screens and option names vary by model and firmware version.
Open the settings screen
Hold the button assigned to START while connecting the product to your PC, then enter “http://192.168.7.1” in the browser’s address bar. This local settings page is available only while the product is connected in configuration mode.
Input mode and directional controls
Current Input Mode: Select an input mode based on the device you are connecting to. For PC, XInput is the general option.

D-pad Mode: Sets how directional input is handled. The existing example setting is “D-pad.” If the directional controls do not respond, check that this setting is configured as intended.
SOCD Cleaning Mode: Sets how input is handled when opposite directions (left/right or up/down) are pressed at the same time. The existing example setting is “Neutral.” When using the controller in a game or tournament, follow the rules published by the organizer.
Startup hotkeys

These settings switch input modes when you hold a button while connecting the product. If you do not need to switch between connection targets, you can turn off shortcuts you do not use to help prevent accidental activation.
Hotkeys while connected

Set shortcuts that activate when you press button combinations while connected. Setting unused combinations to “No Action” can help prevent unintended operation. Check the manual so that you do not disable shortcuts you need.
Button mapping and saving

In “GPIO PIN Viewer,” check the PIN number shown when you press the button you want to change, then edit the corresponding mapping. Click “Save” when you are done.
If you cannot resolve a settings or connection issue, contact us through the contact page.
No questions found
Try another keyword or change the category.
Still need help?Contact us.
If the FAQ did not resolve your issue or you have a question, contact us here.
Contact us